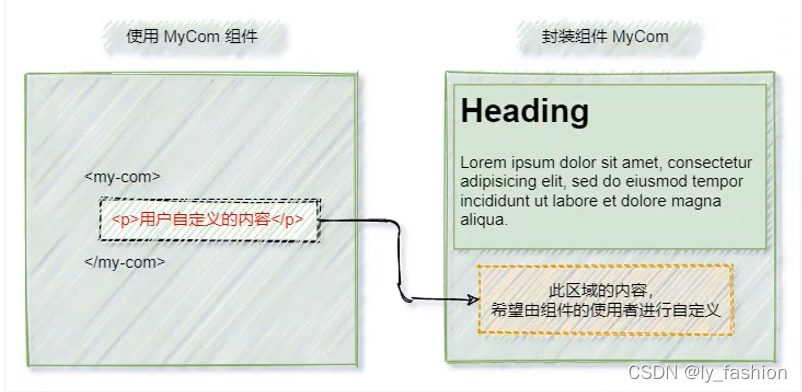
# 什么是插槽
插槽(Slot):是vue为组件的封装者提供的能力。允许开发者在封装组件时,把不确定的,希望由用户指定的部分定义为插槽。

# 插槽内容
1.没有插槽你在组件中写的内容会被忽略。
<template> <div class="right-container"> <Left> <p>这是Left组件的内容区域,声明p标签</p> </Left> </div> </template> // 因为没有给Left组件声明插槽,所以p标签不起作用2.声明插槽,每个插槽都有name名称(默认为default)
<template> <div class="left-container"> <h3>Left 组件</h3> <hr> <!-- 声明一个插槽slot --> <!-- vue官方规定:每个slot插槽都有一个 name名称 --> <!-- 如果省略slot名称,则默认名称为default --> <!-- 当用户没有指定插槽是默认内容是slot标签里的内容 --> <slot name="default">这是default插槽默认的内容</slot> </div> </template>3.v-slot指令:将内容渲染到指定的插槽中(没写 v-slot 则默认渲染到 default 的插槽中)
<template> <div class="app-container"> <h1 v-color="color">App 根组件</h1> <p v-color="'pink'">测试</p> <button @click="color = 'green'">改变color颜色值</button> <hr> <div class="box"> <!-- 渲染 Left 组件和 Right 组件 --> <Left style="display: none;"> <!-- 默认情况下,在使用组件的时候,提供的内容都会被填充到名字为default的插槽中 --> <!-- 1.如果要把内容填充到指定的名称的插槽中,需要v-slot:这个指令 --> <!-- 2.v-slot:要跟上插槽的名称 --> <!-- 3.v-slot:指令不能用在元素身上,只能用在template上 --> <!-- 4.template这个标签是一个虚拟的标签,只起到包裹的作用,但不会被渲染成实质性的html元素--> <!-- 5.v-slot: 简写为# --> <template v-slot:default> <p>这是Left组件的内容区域,声明p标签</p> </template> </Left> </div> </div> </template># 后备内容
有时为一个插槽设置具体的后备 (也就是默认的) 内容是很有用的,它只会在没有提供内容的时候被渲染。例如在一个 <submit-button> 组件中:
<!-- 我们希望这个 <button> 内绝大多数情况下都渲染文本“Submit”。为了将“Submit”作为后备内容,我们可以将它放在 <slot> 标签内 --> <button type="submit"> <slot>Submit</slot> </button> <!-- 现在当我在一个父级组件中使用 <submit-button> 并且不提供任何插槽内容时: --> <submit-button></submit-button> <!-- 此时 Submit 就会渲染到父级组件中 --> <!-- 但是如果我们提供内容时,这个提供的内容将会被渲染从而取代后备内容: --> <submit-button> <!-- Save就会代替Submit渲染到父级组件中 --> Save </submit-button># 具名插槽
在同一个组件中,我们有时需要多个插槽作为预留区域,此时,应该给每一个插槽取一个不同的name名称
如:定义了Article组件,并设置了多个插槽,一个不带 name 的 <slot> 出口会带有隐含的名字“default”。
<template> <div class="article-container"> <!-- 渲染文章的标题 --> <div class="header-box"> <slot></slot> </div> <!-- 文章的内容 --> <div class="content-box"> <slot></slot> </div> <!-- 文章的作者 --> <div class="footer-box"> <slot></slot> </div> </div> </template> <!-- 这时,三个插槽名相同为default,在<Article></Article>中写入的内容会同时渲染到名称相同的插槽: --> <template> <div class="right-container"> <h3>App 组件</h3> <Article> <h3>一首诗</h3> <!-- 上面三个插槽都渲染了内容 “一首诗”--> </Article> </div> </template># 作用域插槽
有时让插槽内容能够访问子组件中才有的数据是很有用的
比如:在子组件Article中设置了 msg,如果插槽内容中要访问到该数据,则:
<template> <div class="right-container"> <h3>Article 组件</h3> <div class="content-box"> <!-- 在封装组件时,为预留的<slot>提供属性对应的值,这种用法叫做"作用域插槽" --> <slot name="content" msg="hello vue.js"></slot> </div> </div> </template> <!-- 在上块代码中,设置了msg="hello vue.js",我们此时需要在插槽内容区内拿到该数据: --> <!-- 插槽内容部分 --> <Article> <!-- #content="obj"中的obj是一个对象,里面包含了Article组件中msg:"hello vue.js"等<slot></slot>中定义的数据 --> <template #content="obj"> <div> <p>床前明月光,疑是地上霜.</p> <p>举头望明月,低头思故乡.</p> <p>{{ obj.msg }}</p> </div> </template> </Article> <!-- 这里的msg就能获取到成功渲染 -->创作不易,一键三联吧!铁汁们!!!
热门文章
- 2月11日|最高速度18.7M/S,2025最新Hysteria2免费节点高速订阅链接,便宜机场推荐
- 12月3日|最高速度22.9M/S,2024最新Hysteria2免费节点高速订阅链接,便宜机场推荐
- C++中的匿名对象的概念和使用
- 12月15日|最高速度21.3M/S,2024最新Hysteria2免费节点高速订阅链接,便宜机场推荐
- 约翰医生的动物医院故事 约翰医生的动物医院故事讲述的秘密是什么
- 动物医院诊疗许可证办理程序规定最新版(动物医院办理条件)
- 动物疫苗去哪里买便宜又好(动物疫苗证去哪里办怎么办)
- 动物疫苗生产许可审批流程(动物疫苗生产许可审批流程视频)
- 淮北宠物店(淮北宠物店招聘)
- 益沣动物医院怎么样啊知乎(益沣动物医院怎么样啊知乎招聘)